
Welcome to the Data at the Point of Care (DPC) pilot API program! This documentation covers using the API in the sandbox environment with synthetic data.
I. Authorization
1. Request Access
Any Original Medicare provider organization or Health IT implementer may request access to the sandbox environment and obtain synthetic data by signing-up for an account through the Sandbox Sign Up / Login page. You will receive a confirmation email from CMS upon account creation.
Once your account has been assigned to an organization, you will be notified with a second email, which will include next steps and an invite to join our Google Group community. At this time, you may log in to the DPC Portal at https://dpc.cms.gov to create your first client token and start your journey with the DPC pilot API!
2. Client Tokens
Create client token
Create multiple client tokens
List all client tokens
Delete client tokens
Client tokens help monitor who is accessing the API through your account. A client token is required to create an access token, which is needed with every request made to the API. This ensures every interaction with the API can be traced back to the person who created the client token.
Create client token
You MUST create different client tokens for every provider organization that works with the API.
Your first client token must be created through the DPC Portal.
- Log in to your account in the DPC Portal and select .
- Add a Label: Title your token with a recognizable name that includes the environment for which you are requesting access.
- Click “Create Token” to generate your client token.

This is the only time that this client token will be visible to you. Ensure that the value is recorded in a safe and durable location.
After successfully accessing the API, you may choose to add client tokens through the API or continue using the DPC Portal.
Create multiple client tokens
You may create as many tokens as you like via your account in the DPC Portal using the instructions above. You can also create multiple client tokens at once by making a POST request to the /Token endpoint.
The /Token endpoint accepts two (optional) query parameters:
| Parameter | Parameter Values | Fixed/Dynamic | Description | Notes |
|---|---|---|---|---|
| label | { insert name for the client token } | Dynamic | Sets a human-readable label for the token | Token labels are not required to be unique. |
| expiration | ISO formatted string | Dynamic | Sets a custom expiration for the client_token |
The user cannot set an expiration time longer than five minutes. |
Request:
POST /api/v1/Token
cURL command:
curl -d '' -v https://sandbox.dpc.cms.gov/api/v1/Token?label={token label}&expiration={ISO formatted dateTime} \
     -H 'Authorization: Bearer {access_token}' \
     -H 'Accept: application/json' \
     -H 'Content-Type: application/json' \
     -X POST
Response:
The response from the API will include the client_token in the token field.
{
  "id": "3c308f6e-0223-42f8-80c2-cab242d68afc",
  "tokenType": "MACAROON",
  "label": "Token for organization 46ac7ad6-7487-4dd0-baa0-6e2c8cae76a0.",
  "createdAt": "2019-11-04T11:49:55.126-05:00",
  "expiresAt": "2020-11-04T11:49:55.095-05:00",
  "token:": "{client_token}"
}
List all client tokens
If you have created multiple client tokens, you may want to list them to reference IDs, expiration dates, or delete specific client tokens from your account in the DPC Portal.
All client tokens registered by your organization for a given environment can be listed by making a GET request to the /Token endpoint. This will return a list of token IDs with details on when they were created, when they expire, and the label associated with that token.
Request:
GET /api/v1/Token
cURL command:
curl -v https://sandbox.dpc.cms.gov/api/v1/Token \
     -H 'Authorization: Bearer {access_token}' \
     -H 'Accept: application/json' \
     -H 'Content-Type: application/json' \
     -X GET
Response:
{
  "created_at": "2019-11-04T11:49:55.126-05:00",
  "count": 3,
  "entities": [
    {
      "id": "3c308f6e-0223-42f8-80c2-cab242d68afc",
      "tokenType": "MACAROON",
      "label": "Token for organization 46ac7ad6-7487-4dd0-baa0-6e2c8cae76a0.",
      "createdAt": "2019-11-04T11:49:55.126-05:00",
      "expiresAt": "2020-11-04T11:49:55.095-05:00"
    },
    {
      "id": "eef87627-db4b-4c08-8a27-e88a8343099d",
      "tokenType": "MACAROON",
      "label": "Token for organization 46ac7ad6-7487-4dd0-baa0-6e2c8cae76a0.",
      "createdAt": "2019-11-04T11:50:06.101-05:00",
      "expiresAt": "2020-11-04T11:50:06.096-05:00"
    },
    {
      "id": "ea314eaa-1cf5-4d01-9ea7-1646099ca9fd",
      "tokenType": "MACAROON",
      "label": "Token for organization 46ac7ad6-7487-4dd0-baa0-6e2c8cae76a0.",
      "createdAt": "2019-11-04T11:50:06.685-05:00",
      "expiresAt": "2020-11-04T11:50:06.677-05:00"
    }
  ]
}
Delete client tokens
You may want to delete a client token from the sandbox environment if a Health IT implementer no longer exists or needs access to the API. This can be done by clicking the “x” on the right side of each client token listed in the DPC Portal or by sending a DELETE request to the /Token endpoint using the unique ID of the client_token.
Client_token IDs can be found either at creation or as the result of listing client_tokens.
Request:
DELETE /api/v1/Token/{client_token id}cURL command:
curl -v https://sandbox.dpc.cms.gov/api/v1/Token/{client_token id} \
     -H 'Authorization: Bearer {access_token}' \
     -H 'Accept: application/json' \
     -H 'Content-Type: application/json' \
     -X DELETE
Response:
200 - Token was removed
3. Public Keys
Upload your first public key
Create a public key signature
List all public keys
List a specific public key
Delete public keys
Public keys verify that client token requests are coming from an authorized application. This is by verifying that the private key used to sign your JSON Web Token (JWT) also matches a public key previously uploaded to DPC. Please complete the upload of your public key + signature through the DPC Portal.
ALL files (e.g., private.pem, public.pem, snippet.txt, snippet.txt.sig, signature.sig files) in this section must be stored in ONE folder.
Upload your first public key
1. Generate a private key.
-
Use the command invocation:
openssl genrsa -out private.pem 4096
The contents of your private key (private.pem file) should be treated as sensitive/secret information. Take care in the handling and storage of this information as it is essential to the security of your connection with DPC.
2. Generate a public key.
-
Use the command invocation:
openssl rsa -in private.pem -outform PEM -pubout -out public.pem
3. Paste the contents of your public key (public.pem file) into the ‘Public Key’ field in the DPC Portal. You must include the “BEGIN PUBLIC KEY” and “END PUBLIC KEY” tags before and after your key.

4. Title your public key with a descriptive name that can be easily recognized for future purposes.
5. Proceed to creating your public key signature.
Create a public key signature
1. Download the snippet.txt file located in the DPC Portal to create a signature.
-
If you are unable to download the snippet.txt file with a GUI, you can download the file using the command invocation below:
curl -JLO https://raw.githubusercontent.com/CMSgov/dpc-app/main/dpc-web/public/snippet.txt
1a. Verify the type of file.
-
If you are using a Mac or Linux shell, you can check the file type with this command. This command will not work in a basic Windows environment.
file snippet.txtResponse must yield snippet.txt: ASCII text, with no line terminators.
2. Create your public key snippet.
-
Use the command invocation:
openssl dgst -sign private.pem -sha256 -out snippet.txt.sig snippet.txt
3. Verify your public key snippet.
-
Use the command invocation:
openssl dgst -verify public.pem -sha256 -signature snippet.txt.sig snippet.txtResponse must yield Verified Ok.
4. Generate a verified public key signature.
-
Use the command invocation:
openssl base64 -in snippet.txt.sig -out signature.sig
5. Paste the contents of your verified public key signature (signature.sig file) into the ‘Public Key Signature’ field in your DPC Account.
6. Click “Add Key” to upload your public key.
-
If you see the error message stating, "Unable to verify your public key" after uploading your public key, re-download the snippet.txt file using the command stated in Step 1, and re-generate your public key and signature pair.
List all public keys
If you have created multiple public keys, you may want to list them to reference IDs, check expiration dates, or delete specific public keys from your account in the DPC Portal.
All public keys registered by your organization for an environment can be listed by making a GET request to the /Key endpoint. This will return a list of public key IDs with details on when they were created, when they expire, and the label associated with that key.
Request:
GET /api/v1/Key
cURL command:
curl -v http://localhost:3002/v1/Key \
     -H 'Authorization: Bearer {access_token}' \
     -H 'Accept: application/json' \
     -H 'Content-Type: application/json' \
     -X GET
Response:
The response from the API will include the client_token in the token field.
{
  "created_at": "2019-11-04T13:16:29.008-05:00",
  "count": 1,
  "entities": [
    {
      "id": "b296f9d2-1aae-4c59-b6c7-c759b9db5226",
      "publicKey": "-----BEGIN PUBLIC KEY-----\nMIIBIjANBgkqhkiG9w0BAQEFAAOCAQ8AMIIBCgKCAQEAmyI+y8vAAFcV4deNdyKC\nH16ZPU7tgwnUzvtEYOp6s0DFjzgaqWmYZd/CNlb1psi+J0ChtcL9+Cx3v+HwDqVx\nToQrEqJ8hMavtXnxm2jPoRaxmbIGjHZ6jfyMot5+CdP8Vr5o9G2WIUgzjhFwMEXh\nlYg97uZadLLVKVXYTl4HtluVX5y7p1Wh4vkyJFBiqrX7qAJXvr6PK7OUeZDeVsse\nOMm33VwgbQSGRw7yWNOw+H/RbpGQkAUtHvGYvo/qLeb+iJsF2zBtjnkTmk5I8Vlo\n4xzbqaoqZqsHp4NgCw+bq0Y6AWLE2yUYi/DOatOdIBfLxlpf/FAY3f5FbNjISUuL\nmwIDAQAB\n-----END PUBLIC KEY-----\n",
      "createdAt": "2019-11-04T13:16:29.008-05:00",
      "label": "test-key"
    }
  ]
}
List a specific public key
If you have created multiple public keys, you may want to confirm the expiration date or content of a single public key from your account in the DPC Portal.
Specific public keys can be listed by making a GET request to the /Key endpoint using the unique id of the public key.
Request:
GET /api/v1/Key/{public key id}cURL command:
curl -v https://sandbox.dpc.cms.gov/api/v1/Key/{public key id} \
     -H 'Authorization: Bearer {access_token}' \
     -H 'Accept: application/json' \
     -H 'Content-Type: application/json' \
     -X GET
Response:
{
  "id": "b296f9d2-1aae-4c59-b6c7-c759b9db5226",
  "publicKey": "-----BEGIN PUBLIC KEY-----\nMIIBIjANBgkqhkiG9w0BAQEFAAOCAQ8AMIIBCgKCAQEAmyI+y8vAAFcV4deNdyKC\nH16ZPU7tgwnUzvtEYOp6s0DFjzgaqWmYZd/CNlb1psi+J0ChtcL9+Cx3v+HwDqVx\nToQrEqJ8hMavtXnxm2jPoRaxmbIGjHZ6jfyMot5+CdP8Vr5o9G2WIUgzjhFwMEXh\nlYg97uZadLLVKVXYTl4HtluVX5y7p1Wh4vkyJFBiqrX7qAJXvr6PK7OUeZDeVsse\nOMm33VwgbQSGRw7yWNOw+H/RbpGQkAUtHvGYvo/qLeb+iJsF2zBtjnkTmk5I8Vlo\n4xzbqaoqZqsHp4NgCw+bq0Y6AWLE2yUYi/DOatOdIBfLxlpf/FAY3f5FbNjISUuL\nmwIDAQAB\n-----END PUBLIC KEY-----\n",
  "createdAt": "2019-11-04T13:16:29.008-05:00",
  "label": "test-key"
}
Delete public keys
You may need to delete a public key from the DPC Portal if you no longer need access.
Public keys can be removed by sending a DELETE request to the /Key endpoint using the unique ID of the public key, which is returned either at creation, or as the result of listing the public keys.
Request:
DELETE /api/v1/Key/{public key ID}cURL command:
curl -v https://sandbox.dpc.cms.gov/api/v1/Key/{public key id} \
     -H 'Authorization: Bearer {access_token}' \
     -H 'Accept: application/json' \
     -H 'Content-Type: application/json' \
     -X DELETE
Response:
The response from the API will include the client_token in the token field.
200 - Key was removed
4. IP Addresses
Note: This step is required only for access to production data. You complete this step in the DPC Portal.
You’ll need to provide a public IP address for your organization. This address is associated with the systems that will be accessing production data. You’ll choose a descriptive name for your address and enter it in the Portal in the form XXX.XXX.XX.XX.
Note: You can use a maximum of 8 IP addresses. Only IPv4 addresses are allowed. DPC doesn’t support IP address ranges.
5. JSON Web Tokens
Validate a JSON web token for DPC
A JSON Web Token (JWT) authenticates your organization with DPC.
Complete the following steps to generate your JWT via the JWT Tool.
You need internet access to use this tool’s cryptography. However, your information is not sent over the network to ensure your private key and JWT remain confidential.
- Input your Private Key.
- Input your Client Token.
- Input your Public Key ID.
- This ID can be found under the “Public Keys” section in your DPC Portal.

- This ID can be found under the “Public Keys” section in your DPC Portal.
- Click “Generate JWT”.
- Copy “Your JWT” to begin validation for DPC.
Complete the following steps to generate your own JWT.
- Generate your JWT payload.
{ “iss”: {client_token}, “sub”: {client_token}, “aud”: "https://sandbox.dpc.cms.gov/api/v1/Token/auth", “exp”: {current datetime + 5 minutes}, “jti”: {JWT_unique_id} } - Generate your JWT header.
{ "alg": "RS384", “kid”: “{public_key_id}” } - Sign your JWT with your header and private key.
Validate a JSON web token for DPC
The DPC API supports a /Token/validate endpoint, which allows you to submit your signed JWT for DPC validation. If the fields do not contain the required requests, the response will return an error message with details as to which claims or values on the JWT are missing or incorrect.
This method DOES NOT validate the JWT signature, public key, or client tokens. It merely verifies that the necessary elements are present in the JWT entity.
Request:
POST /api/v1/Token/validate
cURL command:
curl -v https://sandbox.dpc.cms.gov/api/v1/Token/validate \
     -H 'Accept: application/json' \
     -H 'Content-Type: text/plain' \
     -X POST \
     -d "{Signed JWT}"
Response:
The response from the API will return with a HTTP 200 if the JWT is valid; otherwise, an error message will be returned.
6. Access/Bearer Token
Obtain an access_token
Obtain a bearer_token
Obtaining an access token is the final step in connecting to the DPC API. The access token must be set in the Authorization header in EVERY API request and has a maximum expiration time of 5 MINUTES.
Example header:
Authorization: Bearer {access_token}Obtain an access_token
In order to receive an access token, the valid JWT must be submitted to the /Token/auth endpoint via a POST request. The POST request body is encoded as application/x-www-form-urlencoded.
1. Set the JWT as the client_assertion form parameter.
2. Add the remaining fields below:
| Parameters | Parameter Values | Fixed/Dynamic | Notes |
|---|---|---|---|
| "scope": | "system/*.*" | Fixed | The requested scope MUST be equal to or less than a the scope originally granted to the authorized accessor. |
| "grant_type": | "client_credentials" | Dynamic | The format of the assertion as defined by the authorization server. |
| "client_assertion_type": | "urn:ietf:params:oauth:client-assertion-type:jwt-bearer" | Fixed | The format of the assertion as defined by the authorization server. |
| "client_assertion": | "{Signed authentication JWT value}" | Dynamic | The assertion being used to authenticate the client. |
Request:
POST /api/v1/Token/auth
cURL command:
curl -v "https://sandbox.dpc.cms.gov/api/v1/Token/auth" \
     -H 'Content-Type: application/x-www-form-urlencoded' \
     -H 'Accept: application/json' \
     -X POST \
     -d "grant_type=client_credentials&scope=system%2F*.*&client_assertion_type=urn%3Aietf%3Aparams%3Aoauth%3Aclient-assertion-type%3Ajwt-bearer&client_assertion={self-signed JWT}"
Response:
The endpoint response is a JSON object which contains the access token, the lifetime of the token (in seconds), and the authorized system scopes.
{
 "access_token": "{access_token value}",
 "token_type": "bearer",
 "expires_in": 300,
 "scope": "system/*.*"
}
Your JWT must contain an expiration of five minutes.
You can create multiple access tokens with the same valid JWT. However, once your access token expires, you will likely need to generate a new JWT using the JWT Tool or create your own JWT to refresh your access token.
Obtain a bearer_token
To obtain your bearer_token, set your access_token returned in the previous section as your bearer_token. You will need to set the “{access_token value}” from the previous response as a header in most of your API calls preceded by the word Bearer and a space.
As access tokens expire, you will need to generate new tokens. You will not need to create new JWT’s to create a new access token, unless you are making a call with a different client token or public key.
Sample JavaScript code to create a JWT and obtain an access token
const jsrsasign = require('jsrsasign')
const fetch = require('node-fetch')
const { URLSearchParams } = require('url')
var dt = new Date().getTime();
var uuid = 'xxxxxxxx-xxxx-4xxx-yxxx-xxxxxxxxxxxx'.replace(/[xy]/g, function(c) {
    var r = (dt + Math.random()*16)%16 | 0;
    dt = Math.floor(dt/16);
    return (c=='x' ? r :(r&0x3|0x8)).toString(16);
  });
var data = {
    "iss": "W3sidiI6Miwib....==",  //THESE VALUES COME FROM THE MACAROON (CLIENT TOKEN) YOU OBTAINED FROM DPC
    "sub": "W3sidiI6Miwib....==",  // THE SAME VALUE GOES IN BOTH "iss" and "sub" fields
    "aud": "https://sandbox.dpc.cms.gov/api/v1/Token/auth",
    "exp": Math.round(new Date().getTime() / 1000) + 300,
    "iat": Math.round(Date.now()),
    "jti": uuid,
  };
var secret = "-----BEGIN RSA PRIVATE KEY-----\n" +
   "MIIJKAIBAAKCAgEAyw/is619pPp2jxQBYHBsF75XrGYh27X/UKzrKsBAWKb3ymC9\n" +
   //THIS IS THE PRIVATE KEY THAT IS ASSOCIATED WITH THE PUBLIC KEY
   "................................................................\n" +
   //YOU REGISTERED WITH DPC
   "................................................................\n" +
   "-----END RSA PRIVATE KEY-----\n";
   //PRIVATE KEY
var sHeader = JSON.stringify("de56ae6d-e42c-4738-81e6-c23009797cd1");
const header = {
    'alg': 'RS384',
    'kid': 'XXXXXXXXXXXXXXXXX',
    //THIS IS THE KEY ID THAT IS ASSOCIATED WITH THE PUBLIC KEY
    //YOU REGISTERED WITH DPC
  }
var sPayload = JSON.stringify(data);
var sJWT = jsrsasign.jws.JWS.sign("RS384", header, sPayload, secret);
fetch('https://sandbox.dpc.cms.gov/api/v1/Token/auth', {
   method: 'POST',
   header: 'ACCEPT: application/json',
   body: new URLSearchParams({
       scope: "system/*.*",
       grant_type: "client_credentials",
       client_assertion_type: "urn:ietf:params:oauth:client-assertion-type:jwt-bearer",
       client_assertion: sJWT
   })
}).then(response => {
   if (response.ok) {
       response.json().then(json => {
           console.log(json);
       });
   }
});
Back to Start of Section
Back to Top of Page
II. Attestation & Attribution
Before accessing patient data, DPC must establish that you have a valid patient-practitioner relationship with CMS Medicare and Medicaid Beneficiaries. This process is referred to as Attestation/Attribution in the DPC API.
You will need to register practitioners in your organization, register patients in your care, and attribute patients to the practitioners treating them. You must also keep these attributions up-to-date by submitting an attestation that testifies these relationships are valid with each submission.
The DPC Sandbox Environment does not contain any preloaded test data.
Load sample data
The DPC Team has created a collection of sample Practitioner, Patient, and Group Resources which can be used to get started in the sandbox environment. These resources can be found in our public GitHub repository as JSON files. More details included in this README file.
Uploading Practitioners: We have included four Practitioner Resources that represent fictitious practitioners that you can add to your organization.
Uploading Patients: The Beneficiary FHIR Data Server (BFD) maintains a list of 101 patients, along with their MBIs, that can be used for matching existing synthetic data in the sandbox environment. More details and the corresponding data files can be found on the Blue Button 2.0 API’s documentation under Sample Beneficiaries.
Users can provide their own sample FHIR resources that fulfill the required FHIR profiles to DPC, but will need to ensure that all Patient Resources have a Medicare Beneficiary Identifier (MBI) that matches a record in BFD.
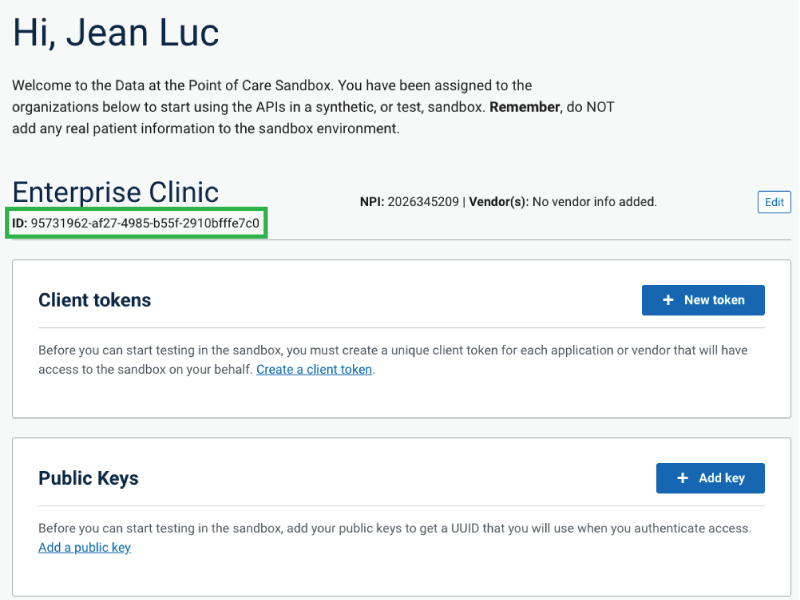
Find Organization ID
You will need your Organization ID to create an Attribution Group for Attestation. The Organization endpoint supports a GET /Organization operation, which allows the user to retrieve their Organization ID.
To find your Organization ID, sign-in to your account in the DPC Portal and locate your Organization ID underneath the Organization name. You can also make a request to /Organization via the sandbox API and retrieve your Organization ID from the response.
Request:
GET /api/v1/Organization
cURL command:
Authorization: Bearer {access_token}
Accept: application/fhir+json
Prefer: respond-async
cURL command
curl -v https://sandbox.dpc.cms.gov/api/v1/Organization
     -H 'Authorization: Bearer {access_token}'
     -H 'Accept: application/fhir+json' \
     -H 'Content-Type: application/fhir+json' \
     -X GET
Response:
{
    "resourceType": "Bundle",
    "type": "collection",
    "total": 1,
    "entry": [
        {
            "resource": {
                "resourceType": "Organization",
                "id": "351fbb5f-f2f9-4094-bc6f-2b3600bb56e9",
                "identifier": [
                    {
                        "system": "http://hl7.org/fhir/sid/us-npi",
                        "value": "3905293015"
                    }
                ],
                "name": "Happy Healthcare",
                "address": [
                    {
                        "use": "work",
                        "type": "postal",
                        "line": [
                            "1 Main Street"
                        ],
                        "city": "Baltimore",
                        "state": "MD",
                        "postalCode": "21224",
                        "country": "US"
                    }
                ],
                "endpoint": [
                    {
                        "reference": "Endpoint/ccf649dd-5258-4c97-a378-449693e73997"
                    }
                ]
            }
        }
    ]
}
It is still possible to retrieve your organization using /Organization/{id}, in which case you will receive a single resource instead of a bundle.
Request:
GET /api/v1/Organization/{id}
cURL command:
Authorization: Bearer {access_token}
Accept: application/fhir+json
Prefer: respond-async
cURL command
curl -v https://sandbox.dpc.cms.gov/api/v1/Organization/{id}
     -H 'Authorization: Bearer {access_token}' \
     -H 'Accept: application/fhir+json' \
     -H 'Content-Type: application/fhir+json' \
     -X GET
Response:
{
    {"resourceType": "Organization",
  "id": "351fbb5f-f2f9-4094-bc6f-2b3600bb56e9",
  "identifier": [
    {
      "system": "http://hl7.org/fhir/sid/us-npi",
      "value": "3905293015"
    }
  ],
  "name": "Happy Healthcare",
  "address": [
    {
      "use": "work",
      "type": "postal",
      "line": [
          "1 Main Street"
      ],
      "city": "Baltimore",
      "state": "MD",
      "postalCode": "21224",
      "country": "US"
    }
  ],
  "endpoint": [
    {
      "reference": "Endpoint/ccf649dd-5258-4c97-a378-449693e73997"
    }
  ]
}
Practitioners
Add a practitioner
Add multiple practitioners
List all practitioners
List a specific practitioner
Every organization is required to keep a list of Practitioner Resources who are authorized to have access to DPC data. The DPC Team has included four Practitioner Resources that represent fictitious practitioners that can be added to your organization.
Add a practitioner
To register a practitioner at your organization, you must send a FHIR-formatted Practitioner Resource as the BODY of your request. Do not use encoding (raw) when uploading via a POST request to the /Practitioner endpoint.
The Practitioner Resource may include additional attributes detailed in the FHIR Implementation Guide within DPC Practitioner Profile, but at a minimum must include the practitioner’s:
- First and last name
- Type 1 National Provider Identifier (NPI)
- Note: If an existing practitioner is found with the same NPI, the
/practitionerendpoint will return that same practitioner and not return a new one.Request:
- Note: If an existing practitioner is found with the same NPI, the
POST /api/v1/Practitioner
cURL command:
curl -v https://sandbox.dpc.cms.gov/api/v1/Practitioner
     -H 'Authorization: Bearer {access_token}' \
     -H 'Accept: application/fhir+json' \
     -H 'Content-Type: application/fhir+json' \
     -X POST \
     -d @practitioner.json
Add Multiple Practitioners
The Practitioner endpoint supports a $submit operation, which allows you to upload a bundle of resources for registration in a single batch operation.
Each individual Practitioner Resource in your bundle must satisfy the requirements on how to add a Practitioner Resource; otherwise, a 422-Unprocessable Entity error will be returned.
Request:
POST /api/v1/Practitioner/$submit
cURL command:
curl -v https://sandbox.dpc.cms.gov/api/v1/Practitioner/\$submit
     -H 'Authorization: Bearer {access_token}' \
     -H 'Accept: application/fhir+json' \
     -H 'Content-Type: application/fhir+json' \
     -X POST \
     -d @practitioner_bundle.json
List all practitioners
The Practitioner endpoint supports a GET /Practitioner operation, which allows you to retrieve a bundle of Practitioner Resources. You will need to retrieve a Practitioner’s NPI when you get to the Attribution section.
Request:
GET /api/v1/Practitioner
cURL command:
curl -v https://sandbox.dpc.cms.gov/api/v1/Practitioner
     -H 'Authorization: Bearer {access_token}' \
     -H 'Accept: application/fhir+json' \
     -H 'Content-Type: application/fhir+json' \
     -X GET
List a specific practitioner
The Practitioner endpoint also supports a GET /Practitioner operation where you can supply an NPI number and receive the Practitioner Resource. You will use this to identify a Practitioners’ DPC ID based off of an NPI when adding a practitioner and/or creating a group.
Request:
GET /api/v1/Practitioner?identifier={Practitioner NPI}cURL command:
curl -v https://sandbox.dpc.cms.gov/api/v1/Practitioner
     -H 'Authorization: Bearer {access_token}' \
     -H 'Accept: application/fhir+json' \
     -H 'Content-Type: application/fhir+json' \
     -X GET
Response:
{
  "resourceType": "Bundle",
  "type": "searchset",
  "total": 1,
  "entry": [
    {
      "resource": {
        "resourceType": "Practitioner",
        "id": "8d80925a-027e-43dd-8aed-9a501cc4cd91",
        "meta": {
          "lastUpdated": "2020-06-10T18:43:14.150+00:00",
          "profile": [
            "https://dpc.cms.gov/api/v1/StructureDefinition/dpc-profile-practitioner"
          ]
        },
        "identifier": [
          {
            "system": "http://hl7.org/fhir/sid/us-npi",
            "value": "2323232225"
          }
        ],
        "name": [
          {
            "family": "Holguín308",
            "given": [
              "Alejandro916"
            ]
          }
        ]
      }
    }
  ]
}
Patients
Add a patient
Add multiple patients
List all patients
List a specific patient
Every organization is required to maintain a list of patients which represent the patient population currently being treated at your facilities.
Since there is not any preloaded data in DPC’s sandbox, the Beneficiary FHIR Data Server (BFD) maintains a list of 101 Patients, along with their MBIs, that can be used for matching existing synthetic data in the sandbox environment. More details and the corresponding data files can be found on the Blue Button 2.0 API’s documentation under Sample Beneficiaries.
Add a patient
To register a patient at your organization, you must create a Patient Resource as a JSON file in FHIR format. The JSON file must be in the BODY of your request with no encoding (raw) when uploading via a POST request to the /Patient endpoint.
To create the Patient Resource, the JSON file may include additional attributes detailed in the FHIR Implementation Guide within the DPC Practitioner Profile, but at a minimum must include the patient’s:
- First and last name
- Birth date in YYYY-MM-DD
- Gender
- When sharing data, DPC uses the Patient.gender property to represent the sex of the patient as maintained on record at CMS. When registering a patient to your organization, DPC will require the Patient.gender property to be submitted following the corresponding value set. The input provided may be used by DPC to match and validate the patient against CMS records.
- Medicare Beneficiary Identifier (MBI)
- Note: If an existing patient is found with the same MBI, the /patient endpoint will return that same patient and not return a new one.
- For example:
{
  system: 'https://bluebutton.cms.gov/resources/variables/bene_id',
  value:  'Value of the MBI number'
}
OR
{ "system": "http://hl7.org/fhir/sid/us-mbi", "value": "Value of the MBI number" } -
Managing Organization ID:
"managingOrganization": {
  "reference": "Organization/{ID}"
}
Request:
POST /api/v1/Patient
cURL command:
curl -v https://sandbox.dpc.cms.gov/api/v1/Patient
     -H 'Authorization: Bearer {access_token}' \
     -H 'Accept: application/fhir+json' \
     -H 'Content-Type: application/fhir+json' \
     -X POST \
     -d @patient.json
Response:
{
 "resourceType": "Parameters",
 "parameter": [
   {
     "name": "resource",
     "resource": {
       "resourceType": "Bundle",
       "id": "synthetic-roster-bundle",
       "type": "collection",
       "entry": [
         {
           "resource": {
             "resourceType": "Patient",
             "id": "728b270d-d7de-4143-82fe-d3ccd92cebe4",
             "meta": {
               "versionId": "MTU1NDgxMjczNTM5MjYwMDAwMA",
               "lastUpdated": "2019-04-09T12:25:35.392600+00:00",
               "profile": [
                 "https://dpc.cms.gov/api/v1/StructureDefinition/dpc-profile-patient"
               ]
             },

             "identifier": [
               {
                 "system": "https://bluebutton.cms.gov/resources/variables/bene_id",
                 "value": "1SQ3F00AA00"
               }
             ],
             "name": [
               {
                 "use": "official",
                 "family": "Prosacco716",
                 "given": [
                   "Jonathan639"
                 ],
                 "prefix": [
                   "Mr."
                 ]
               }
             ],
             "birthDate": "1943-06-08",
           }
         }

       ]
     }
   }
 ]
}
Add multiple patients
The Patient endpoint supports a $submit operation, which allows you to upload a bundle of resources for registration in a single batch operation.
Each Patient Resource in your bundle may include additional attributes detailed in the FHIR Implementation Guide within the DPC Patient Profile, but at a minimum must satisfy the requirements on how to add a Patient Resource; otherwise, a 422 - Unprocessable Entity error will be returned.
Request:
POST /api/v1/Patient/$submit
cURL command:
curl -v https://sandbox.dpc.cms.gov/api/v1/Patient/\$submit
     -H 'Authorization: Bearer {access_token}' \
     -H 'Accept: application/fhir+json' \
     -H 'Content-Type: application/fhir+json' \
     -X POST \
     -d @patient_bundle.json
List all patients
The Patient endpoint supports a GET /Patient operation, which allows you to retrieve a bundle of Patient Resources. You will need to retrieve the DPC ID of patients when you get to the Attribution section.
Request:
GET /api/v1/Patient
cURL command:
curl -v https://sandbox.dpc.cms.gov/api/v1/Patient
     -H 'Authorization: Bearer {access_token}' \
     -H 'Accept: application/fhir+json' \
     -H 'Content-Type: application/fhir+json' \
     -X GET
List a specific patient
The Patient endpoint also supports a GET /Patient operation where you can supply the Patient MBI and receive the Patient Resource. You may use this to identify a Patient’s DPC ID based off of an MBI.
Request:
GET /api/v1/Patient?identifier={Patient MBI}cURL command:
curl -v https://sandbox.dpc.cms.gov/api/v1/Patient
     -H 'Authorization: Bearer {access_token}' \
     -H 'Accept: application/fhir+json' \
     -H 'Content-Type: application/fhir+json' \
     -X GET
Response:
{
  "resourceType": "Bundle",
  "type": "searchset",
  "total": 1,
  "entry": [
    {
      "resource": {
        "resourceType": "Patient",
        "id": "995a1c0f-b6bc-4d16-b6b0-b8a6597c6e1d",
        "meta": {
          "lastUpdated": "2020-06-12T15:39:42.834+00:00",
          "profile": [
            "https://dpc.cms.gov/api/v1/StructureDefinition/dpc-profile-patient"
          ]
        },
        "identifier": [
          {
            "system": "http://hl7.org/fhir/sid/us-mbi",
            "value": "5S41C00AA00"
          }
        ],
        "name": [
          {
            "family": "Wyman904",
            "given": [
              "Cruz300"
            ]
          }
        ],
        "gender": "male",
        "birthDate": "1956-02-08",
        "managingOrganization": {
          "reference": "Organization/351fbb5f-f2f9-4094-bc6f-2b3600bb56e9"
        }
      }
    }
  ]
}
Attestation
CMS requires practitioners to attest that they have a treatment related purpose for adding a patient to their group each time they make a group addition. This is accomplished by submitting an attestation with every request. Attestations are posted as a Provenance Resource via the X-Provenance header, as outlined in the FHIR specification.
Create an attestation
Details on Provenance Resources are given in the FHIR implementation guide, but at a minimum, each attestation must include:
- Timestamp: Time when attestation was made.
- Reason: Reason for the attestation (currently only: http://hl7.org/fhir/v3/ActReason#TREAT is supported).
- Organization ID: The agent making the attestation referenced by their Organization Resource ID.
- Your Organization ID can be found in the DPC Portal by following these instructions.
- Practitioner ID: The practitioner attached to the attestation referenced by their Practitioner ID.
- Your Practitioner ID can be found by referencing the {id} variable in the resource object of your practitioner.
The attestation is then included in the X-Provenance header as part of any operations which add patients to the Group Resource.
Example attestation for X-Provenance header
{
 "resourceType":"Provenance",
 "meta":{
   "profile":[
     "https://dpc.cms.gov/api/v1/StructureDefinition/dpc-profile-attestation"
   ]
 },
 "recorded":"1990-01-01T00:00:00.000-05:00",
 "reason":[
   {
     "system":"http://hl7.org/fhir/v3/ActReason",
     "code":"TREAT"
   }
 ],
 "agent":[
   {
     "role":[
       {
         "coding":[
           {
             "system":"http://hl7.org/fhir/v3/RoleClass",
             "code":"AGNT"
           }
         ]
       }
     ],
     "whoReference":{
       "reference":"Organization/{organization_id}"
     },
     "onBehalfOfReference":{
       "reference":"Practitioner/{practitioner_id}"
     }
   }
 ]
}
Groups (Attribution)
Create a group
Update a group
Add patients to group
Delete a group
Removing patients from a group
Overwrite a group membership
Locate your group.id
Once the Practitioner, Patient, and Provenance (Attestation) Resources have been created, the final step is to link a list of registered patients to a registered practitioner in what is called an Attribution Roster. This is done by creating a Group Resource.
Create a group
To link a list of registered patients to a registered practitioner, you must create a Group Resource by creating a JSON file with a list of patients and a single practitioner to be attributed to. Upload this JSON file via a POST request to the /Group endpoint.
Additional details on Provenance Resource can be found in DPC’s Implementation Guide but, at a minimum, each Attribution Group Resource must include:
- The Practitioner’s NPI which patients are being attributed to.
- The DPC ID of the patient(s) that are members of the group. This value is the alphanumeric DPC ID of the Patient Resource in DPC. It is a UUID.
Parameter and Bundle Resources are NOT to be used when adding, updating, or overwriting groups.
The group response returned by DPC includes additional “period” and “inactive” elements for each patient. These indicate the time period for which the patient has an active relationship with the practitioner, or, if the relationship has expired, the time period for which the patient was active.
Attribution groups must be updated every 90 days!
Practitioners at your organization must update their Provenance (Attestation) and Group Resources by re-attributing the patient to the practitioner’s group every 90 days.
When an attribution relationship between a patient and practitioner has expired, either due to exceeding the 90-day threshold or being manually removed, the patient’s “inactive” flag will be set to “true”. Patients who are attributed to a practitioner, but have their inactive flag set to true, will NOT be included in bulk data exports.
Request:
POST /api/v1/Group
cURL command:
curl -v https://sandbox.dpc.cms.gov/api/v1/Group
     -H 'Authorization: Bearer {access_token}' \
     -H 'Accept: application/fhir+json' \
     -H 'Content-Type: application/fhir+json' \
     -H 'X-Provenance: {FHIR Provenance resource}' \
     -X POST \
     -d @group.json
Response:
{
 "resourceType": "Group",
 "type": "person",
 "actual": true,
 "characteristic": [
   {
     "code": {
       "coding": [
         {
           "code": "attributed-to"
         }
       ]
     },
     "valueCodeableConcept": {
       "coding": [
         {
           "system": "http://hl7.org/fhir/sid/us-npi",
           "code": "110001029483"
         }
       ]
     }
   }
 ],
 "member": [
   {
     "entity": {
       "reference": "Patient/4d72ad76-fbc6-4525-be91-7f358f0fea9d"
     }
   },
   {
     "entity": {
       "reference": "Patient/74af8018-f3a1-469c-9bfa-1dfd8a646874"
     }
   }
 ]
}
Update a group
Patient/practitioner relationships automatically expire after 90 days and must be re-attested by the practitioner. This is accomplished by re-attributing the patient to the practitioner’s group.
Identifying expired patients
After 90 days, patient attributions expire and must be renewed. You can identify these patients through a GET request to the /Group endpoint. This will return a JSON file with all the patients attributed to the group. Evaluate this JSON for patients with attribution dates greater than 90 days.
Request
GET api/v1/Group?characteristic-value=attributed-to${Group ID}cURL command:
curl -v https://sandbox.dpc.cms.gov/api/v1/Group?characteristic-value=attributed-to${Group ID}
     -H 'Authorization: Bearer {access_token}' \
     -H 'Accept: application/fhir+json'
Response:
{
 "resourceType": "Group",
 "type": "person",
 "actual": true,
 "characteristic": [
   {
     "code": {
       "coding": [
         {
           "code": "attributed-to"
         }
       ]
     },
     "valueCodeableConcept": {
       "coding": [
         {
           "system": "http://hl7.org/fhir/sid/us-npi",
           "code": "110001029483"
         }
       ]
     }
   }
 ],
 "member": [
   {
     "entity": {
       "reference": "Patient/bb151edf-a8b5-4f5c-9867-69794bcb48d1"
     }
   }
 ]
}
Add patients to group
Additions are handled through a custom $add operation on the /Group endpoint. This takes the members listed into a given resource and adds them to the existing group.
Request:
POST /api/v1/Group/{Group.id}/$addcURL command:
curl -v https://sandbox.dpc.cms.gov/api/v1/Group/{Group.id}/\$add
     -H 'Authorization: Bearer {access_token}' \
     -H 'Accept: application/fhir+json' \
     -H 'X-Provenance: {FHIR provenance resource} \
     -X POST \
     -d @group_addition.json
Response:
"member": [
  {
    "entity": {
        "reference": "Patient/871c83f5-5674-450b-a3b6-be3bbcf8a095"
    },
    "period": {
        "start": "2020-06-17T17:44:27+00:00",
        "end": "2020-09-15T17:44:27+00:00"
    },
    "inactive": false
  },
  {
    "entity": {
        "reference": "Patient/ef25ddf1-615e-43d5-b539-6af200ae7da4"
    },
    "period": {
        "start": "2020-06-17T17:53:42+00:00",
        "end": "2020-09-15T17:53:42+00:00"
    },
    "inactive": false
  }
]
Delete a group
You may want to delete a group if you no longer require data for the patients within the group. This can be done by sending a DELETE request to the /Group endpoint using the unique ID of the group.
Group IDs can be found either at creation or as the result of locating your Group ID.
Request:
api/v1/Group/${Group.id}cURL command:
curl -v https://sandbox.dpc.cms.gov/api/v1/Group/${Group.id} \
     -H 'Authorization: Bearer {access_token}' \
     -H 'Accept: application/fhir+json' \
     -H 'Content-Type: application/fhir+json' \
     -X DELETE
Response:
200 - Group was removedRemoving patients from a group
Removals are handled through a custom remove operation on the /Group endpoint. This takes the members listed into a given resource and removes them from the existing group.
The remove function does not delete the resources, but sets the inactive parameter to true.
Request:
POST /api/v1/Group/{Group.id}/$removecURL command:
curl -v https://sandbox.dpc.cms.gov/api/v1/Group/{Group.id}/\$remove
     -H 'Authorization: Bearer {access_token}' \
     -H 'Accept: application/fhir+json' \
     -X POST \
     -d @group_removal.json
Response:
{
 "resourceType": "Group",
 "type": "person",
 "actual": true,
 "characteristic": [
   {
     "code": {
       "coding": [
         {
           "code": "attributed-to"
         }
       ]
     },
     "valueCodeableConcept": {
       "coding": [
         {
           "system": "http://hl7.org/fhir/sid/us-npi",
           "code": "110001029483"
         }
       ]
     }
   }
 ],
 "member": [
   {
     "entity": {
       "reference": "Patient/4d72ad76-fbc6-4525-be91-7f358f0fea9d"
     }
   }
 ]
}
Overwrite a group membership
Users can also submit a Group Resource which completely overwrites the existing group. This results in the current group membership being completely overwritten with the members listed in the given resource.
This endpoint does not merge with the existing membership state, but completely replaces what currently exists.
Request:
PUT /api/v1/Group/{Group.id}cURL command:
curl -v https://sandbox.dpc.cms.gov/api/v1/Group/{Group.id}
     -H 'Authorization: Bearer {access_token}' \
     -H 'Accept: application/fhir+json' \
     -H 'X-Provenance: {FHIR provenance resource} \
     -X PUT \
     -d @updated_group.json
Response:
{
 "resourceType": "Group",
 "type": "person",
 "actual": true,
 "characteristic": [
   {
     "code": {
       "coding": [
         {
           "code": "attributed-to"
         }
       ]
     },
     "valueCodeableConcept": {
       "coding": [
         {
           "system": "http://hl7.org/fhir/sid/us-npi",
           "code": "110001029483"
         }
       ]
     }
   }
 ],
 "member": [
   {
     "entity": {
       "reference": "Patient/4d72ad76-fbc6-4525-be91-7f358f0fea9d"
     }
   },
   {
     "entity": {
       "reference": "Patient/bb151edf-a8b5-4f5c-9867-69794bcb48d1"
     }
   }
 ]
}
Locate your Group.id
You may only pull data for one practitioner’s roster at a time.
You can do this by sending a GET request to the Group endpoint to retrieve the Attribution Group of the practitioner. Use the practitioners’ National Provider Identity (NPI) number as a parameter in this request.
The response will return a Bundle Resource which contains the Attribution Groups for the given practitioner. You can use the Group.id value of the returned resources to initiate an export job. Your Group ID can be found by referencing the {id} variable in the resource object of your group.
Example:
"resource": {
  "resourceType": "Group",
  "id": "64d0cd85-7767-425a-a3b8-dcc9bdfd5402"
}
Request:
GET
/api/v1/Group?characteristic-value=attributed-to${Practitioner NPI}
cURL command:
curl -v https://sandbox.dpc.cms.gov/api/v1/Group/{Group.id}
     -H 'Authorization: Bearer {access_token}' \
     -H 'Accept: application/fhir+json' \
     -H 'X-Provenance: {FHIR provenance resource}
Response:
{
 "resourceType": "Bundle",
 "type": "searchset",
 "total": 1,
 "entry": [
   {
     "resource": {
       "resourceType": "Group",
       "id": "64d0cd85-7767-425a-a3b8-dcc9bdfd5402",
       "type": "person",
       "actual": true,
       "characteristic": {
         "code": {
           "coding": [
             {
               "code": "attributed-to"
             }
           ]
         },
         "valueCodeableConcept": {
           "coding": [
             {
               "system": "http://hl7.org/fhir/sid/us-npi",
               "code": "{Practitioner NPI}"
             }
           ]
         }
       },
       "member": [
         {
           "entity": {
             "reference": "Patient/4d72ad76-fbc6-4525-be91-7f358f0fea9d"
           }
         },
         {
           "entity": {
             "reference": "Patient/74af8018-f3a1-469c-9bfa-1dfd8a646874"
           }
         }
       ]
     }
   }
Back to Start of Section
Back to Top of Page
III. Export Data
The primary interaction with the DPC pilot API is via the FHIR /Group/$export operation. This allows an organization to export Patient, Coverage, and Explanation of Benefit data in an asynchronous and bulk manner. Details on the FHIR bulk data operations can be found in the FHIR Bulk Data Specification.
Initiate an export job
In order to start a patient data export job, you will need to locate your Group.id. Locate your Group.id by referencing the {id} variable in the resource object of your group.
Example:
"resource": {
  "resourceType": "Group",
  "id": "64d0cd85-7767-425a-a3b8-dcc9bdfd5402"
}
Next, make a GET request to the /Group/$export endpoint with three required headers: an access token, an Accept header, and a Prefer header.
The dollar sign (‘$’) before the word “export” in the URL indicates that the endpoint is an action rather than a resource. The format is defined by the FHIR Bulk Data Specification.
Request:
GET /api/v1/Group/{attribution group ID}/$exportcURL command:
curl -v https://sandbox.DPC.cms.gov/api/v1/Group/{attribution Group.id}/\$export \
     -H 'Authorization: Bearer {access_token}' \
     -H 'Accept: application/fhir+json' \
     -H 'Prefer: respond-async'
Response:
If the request was successful, a 202 Accepted response code will be returned with a Content-Location header. The value of this header indicates the location to monitor your job status and outcomes. The value of the header also contains the Export Job ID of the Job. There is no BODY to the response, only headers.
Example:
Content-Location: https://sandbox.dpc.cms.gov/api/v1/Jobs/{unique ID of export job}Specify which resources to download
The _type query parameter allows you to specify which FHIR resources you wish to export. If you do not specify a _type parameter in your request, all three resources will be exported. Currently, DPC makes Explanation of Benefit, Patient, and Coverage Resources available, which can be specified individually or as a group using a comma delimited list and the syntax ?_type=ExplanationOfBenefit,Patient,Coverage.
The following request will export the Patient and Coverage Resources, but NOT the Explanation of Benefit Resource.
Request:
GET /api/v1/Group/{attribution group ID}/$export?_type=Patient,CoverageThe following request, by contrast, will export the Explanation of Benefit Resource, but NOT the Patient or Coverage Resources.
Request:
GET /api/v1/Group/{attribution group ID}/$export?_type=ExplanationOfBenefitRequesting filtered data
You may want to obtain filtered data for all of your beneficiaries in order to reduce file size and download time.
You can filter data using the _since parameter with either the /Patient or /Group endpoints. You may want to set _since queries as a repeating call or as a way to check for patient updates to avoid downloading duplicate data.
Before using _since, download all of your data.
Before using _since for the first time, we recommend that you run an unfiltered request (without using _since) to all resource types using the /Group/{id}/$export endpoint in order to retrieve all historical data for your associated beneficiaries. You only need to do this once.
On subsequent calls you can begin retrieving incremental claims data for your beneficiaries using _since. We suggest using the transactionTime from your last bulk data request as the _since date.
You can make two types of filtered requests for data:
- Request the most recent data for all beneficiaries: Use _since within the /Group endpoint.
- Request data synchronously for an individual patient: Use _since within the /Patient endpoint.
Steps
Each request will follow the same four-step process as an unfiltered request:
- Obtain an access token.
- Start a job to acquire data (you will input the _since parameter here).
- Check the job status.
- Download the data.
The only difference appears in the request of step 2: “start a job to acquire data”. We show examples of this step below.
Dates and times submitted in _since must be listed in the FHIR Instant format (YYYY-MM-DDThh:mm:sss[-/+]zz:zz).
- Sample Date: February 20, 2020 12:00 PM EST
- Instant Format: YYYY-MM-DDThh:mm:sss[-/+]zz:zz
- Formatted Sample: 2020-02-20T12:00:00.000-05:00
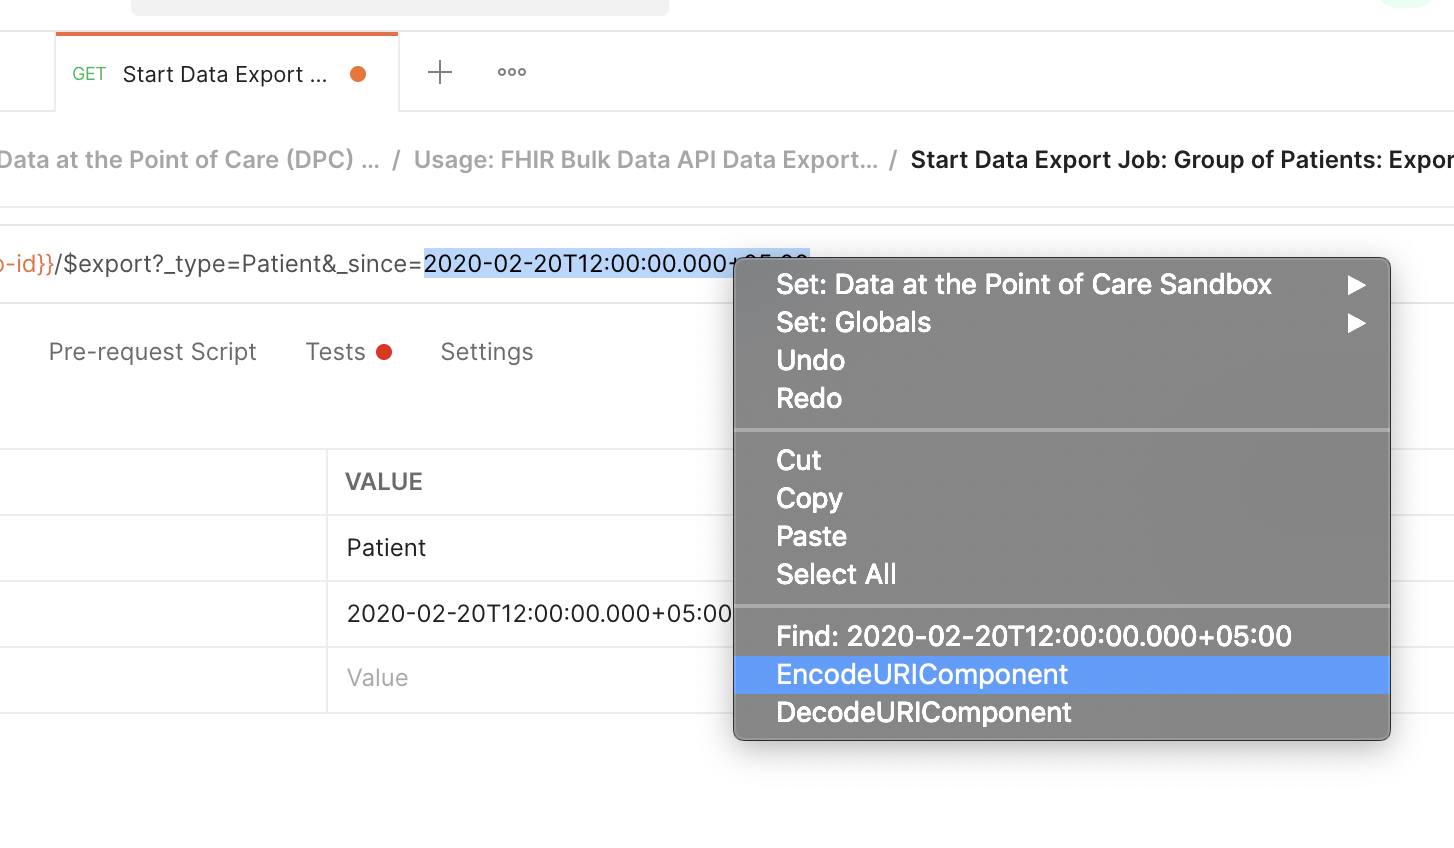
The value of the _since parameter must be URL encoded.
When using the Postman Collection, you will need to manually encode the _since parameter when it contains a + sign since Postman does not automatically encode this character.
You can do this either by replacing the + with %2B (e.g., 2020-01-23T04:00:00.000%2B07:00 instead of 2020-01-23T04:00:00.000+07:00), or you can select the value and choose “EncodeURIComponent” from the context menu to have Postman encode the entire parameter automatically.
An access token as well as Accept and Prefer headers are required for the Group/{id}all/$export.
The Prefer header is NOT required for /Patient/{id}/$everything, but it DOES require an X-Provenance header whereas the /Group/{id}/$export endpoint does not. The format is defined by the FHIR Bulk Data Export spec. Consult the FHIR Datatypes page for more information.
Be wary of requesting data from before 02-12-2020
Due to limitations in the Beneficiary FHIR Data (BFD) Server, data from before 02-12-2020 is marked with the arbitrary lastUpdated date of 01-01-2020. If you input dates between 01-01-2020 and 02-11-2020 in the _since parameter, you will receive all historical data for your beneficiaries. Data loads from 02-12-2020 onwards have been marked with accurate dates.
Requesting data using _since with the /Group endpoint
Request to start a job using the _since parameter within the /Group endpoint
GET /api/v1/Group/{id}/$export?_type=Patient&_since=2020-02-13T08:00:00.000-05:00
Request headers:
Authorization: Bearer {access_token}
Accept: application/fhir+json
Prefer: respond-async
cURL command using the _since parameter within the /Group endpoint:
curl -X GET 'https://sandbox.dpc.cms.gov/api/v1/Group/{id}/$export?_since=2021-05-13T08:00:00.000-05:00' \
	-H "Accept: application/fhir+json" \
	-H "Prefer: respond-async" \
	-H "Authorization: Bearer {access token}
Response example: successful request
202 AcceptedThis operation will start a job for filtered data for existing beneficiaries since 8PM EST on May 13th, 2021 and will include all seven years of historical data for all patients in the Group who have a lastUpdated date that falls after the _since date. In the example, we request the Patient Resource Type. The steps and format would work similarly for other resource types.
If the request was successful, a 202 Accepted response code will be returned and the response will include a Content-Location header.
Requesting data using _since with the /Patient endpoint
Request data synchronously for an individual patient using the _since parameter within the /Patient/{id}/$everything endpoint
GET /api/v1/Patient/{id}/$everything?_since=2020-02-13T08:00:00.000-05:00
Request headers:
Authorization: Bearer {access_token}
Accept: application/fhir+json
X-Provenance: {provenance header}
cURL command using the _since parameter within the /Patient endpoint:
curl -X GET 'https://sandbox.dpc.cms.gov/api/v1/Patient/{id}/$everything?_since=2021-05-13T08:00:00.000-05:00' \
	-H "Accept: application/fhir+json" \
	-H "X-Provenance: {provenance header}" \
	-H "Authorization: Bearer {access token}"
Response example: successful request
200 SuccessThis operation will return all data for the specified patient since the selected date: May 13, 2021. Notice that we are seeking data from the /Patient/{id}/$everything endpoint. This is a synchronous request for an individual patient referenced by the internal ID (UUID) and would behave differently if it was made from the /Group endpoint as data is returned immediately.
If the request was successful, a 200 Success response code will be returned and the response will not include a Content-Location header. Instead, it contains the data in the body of the response.
Check status of the export job
You can check the status of your job using the {unique ID of the export job}. This is retrieved from the Content-Location header of the response as shown in the previous section. The status of the job will change from 202 Accepted to 200 OK when the export job is complete and the data is ready to be downloaded.
Request:
GET https://sandbox.dpc.cms.gov/api/v1/Jobs/{unique ID of export job}cURL command:
curl -v https://sandbox.dpc.cms.gov/api/v1/Jobs/{unique ID of export job} \
     -H 'Authorization: Bearer {access_token}'
Response:
If the request was successful, the status of the job will change from 202 Accepted to 200 OK when the export job is complete and the data is ready to be downloaded.
Example: Bulk Export Job
{
 "transactionTime": "2018-10-19T14:47:33.975024Z",
 "request": "https://sandbox.dpc.cms.gov/api/v1/Group/64d0cd85-7767-425a-a3b8-dcc9bdfd5402/$export",
 "requiresAccessToken": true,
 "output": [
   {
     "type": "ExplanationOfBenefit",
     "url": "https://sandbox.dpc.cms.gov/api/v1/data/42/DBBD1CE1-AE24-435C-807D-ED45953077D3.ndjson",
     "extension": [
       {
         "url": "https://dpc.cms.gov/checksum",
         "valueString": "sha256:8b74ba377554fa73de2a2da52cab9e1d160550247053e4d6aba1968624c67b10"
       },
       {
         "url": "https://dpc.cms.gov/file_length",
         "valueDecimal": 2468
       }
     ]
   }
 ],
 "error": [
   {
     "type": "OperationOutcome",
     "url": "https://sandbox.dpc.cms.gov/api/v1/data/42/DBBD1CE1-AE24-435C-807D-ED45953077D3-error.ndjson"
   }
 ]
}
Claims data can be found at the URLs within the output field.
The output includes file integrity information in an extension array. It contains https://dpc.cms.gov/checksum (a checksum in the format algorithm:checksum) and https://dpc.cms.gov/file_length (the file length in bytes).
The number 42 in the example data file URLs is the same job ID from the Content-Location header URL when you initiate an export job. If some of the data cannot be exported due to errors, details of the errors can be found at the URLs in the error field. The errors are provided in NDJSON files as FHIR OperationOutcome resources.
Retrieve the NDJSON output file(s)
To obtain the exported explanation of benefit data, a GET request is made to the output URLs in the job status response when the job reaches the Completed state. The data will be presented as an NDJSON file of ExplanationOfBenefit Resources.
The Data endpoint is not a FHIR resource and doesn’t require the Accept header to be set to application/fhir+json.
Request:
GET https://sandbox.dpc.cms.gov/api/v1/Data/{file_name}cURL command:
curl https://sandbox.dpc.cms.gov/api/v1/Data/{file_name} \
     -H 'Authorization: Bearer {access_token}'
Example: Explanation of Benefit Resource
{
 "status":"active",
 "diagnosis":[
   {
    "diagnosisCodeableConcept":{
       "coding":[
         {
           "system":"http://hl7.org/fhir/sid/icd-9-cm",
           "code":"2113"
         }
       ]
     },
     "sequence":1,
     "type":[
       {
         "coding":[
           {
             "system":"https://bluebutton.cms.gov/resources/codesystem/diagnosis-type",
             "code":"principal",
             "display":"The single medical diagnosis that is most relevant to the patient's chief complaint or need for treatment."
           }
         ]
       }
     ]
   }
 ],
 "id":"carrier-10300336722",
 "payment":{
   "amount":{
     "system":"urn:iso:std:iso:4217",
     "code":"USD",
     "value":250.0
   }
 },
 "resourceType":"ExplanationOfBenefit",
 "billablePeriod":{
   "start":"2000-10-01",
   "end":"2000-10-01"
 },
 "extension":[
   {
     "valueMoney":{
       "system":"urn:iso:std:iso:4217",
       "code":"USD",
       "value":0.0
     },
     "url":"https://bluebutton.cms.gov/resources/variables/prpayamt"
   },
   {
     "valueIdentifier":{
       "system":"https://bluebutton.cms.gov/resources/variables/carr_num",
       "value":"99999"
     },
     "url":"https://bluebutton.cms.gov/resources/variables/carr_num"
   },
   {
     "valueCoding":{
       "system":"https://bluebutton.cms.gov/resources/variables/carr_clm_pmt_dnl_cd",
       "code":"1",
       "display":"Physician/supplier"
     },
     "url":"https://bluebutton.cms.gov/resources/variables/carr_clm_pmt_dnl_cd"
   }
 ],
 "type":{
   "coding":[
     {
       "system":"https://bluebutton.cms.gov/resources/variables/nch_clm_type_cd",
       "code":"71",
       "display":"Local carrier non-durable medical equipment, prosthetics, orthotics, and supplies (DMEPOS) claim"
     },
     {
       "system":"https://bluebutton.cms.gov/resources/codesystem/eob-type",
       "code":"CARRIER"
     },
     {
       "system":"http://hl7.org/fhir/ex-claimtype",
       "code":"professional",
       "display":"Professional"
     },
     {
       "system":"https://bluebutton.cms.gov/resources/variables/nch_near_line_rec_ident_cd",
       "code":"O",
       "display":"Part B physician/supplier claim record (processed by local carriers; can include DMEPOS services)"
     }
   ]
 },
 "patient":{
   "reference":"Patient/20000000000001"
 },
 "identifier":[
   {
     "system":"https://bluebutton.cms.gov/resources/variables/clm_id",
     "value":"10300336722"
   },
   {
     "system":"https://bluebutton.cms.gov/resources/identifier/claim-group",
     "value":"44077735787"
   }
 ],
 "insurance":{
   "coverage":{
     "reference":"Coverage/part-b-20000000000001"
   }
 },
 "item":[
   {
     "locationCodeableConcept":{
       "extension":[
         {
           "valueCoding":{
             "system":"https://bluebutton.cms.gov/resources/variables/prvdr_state_cd",
             "code":"99",
             "display":"With 000 county code is American Samoa; otherwise unknown"
           },
           "url":"https://bluebutton.cms.gov/resources/variables/prvdr_state_cd"
         },
         {
           "valueCoding":{
             "system":"https://bluebutton.cms.gov/resources/variables/prvdr_zip",
             "code":"999999999"
           },
           "url":"https://bluebutton.cms.gov/resources/variables/prvdr_zip"
         },
         {
           "valueCoding":{
             "system":"https://bluebutton.cms.gov/resources/variables/carr_line_prcng_lclty_cd",
             "code":"99"
           },
           "url":"https://bluebutton.cms.gov/resources/variables/carr_line_prcng_lclty_cd"
         }
       ],
       "coding":[
         {
           "system":"https://bluebutton.cms.gov/resources/variables/line_place_of_srvc_cd",
           "code":"99",
           "display":"Other Place of Service. Other place of service not identified above."
         }
       ]
     },
     "service":{
       "coding":[
         {
           "system":"https://bluebutton.cms.gov/resources/codesystem/hcpcs",
           "code":"45384",
           "version":"0"
         }
       ]
     },
     "extension":[
       {
         "valueCoding":{
           "system":"https://bluebutton.cms.gov/resources/variables/carr_line_mtus_cd",
           "code":"3",
           "display":"Services"
         },
         "url":"https://bluebutton.cms.gov/resources/variables/carr_line_mtus_cd"
       },
       {
         "valueQuantity":{
           "value":1
         },
         "url":"https://bluebutton.cms.gov/resources/variables/carr_line_mtus_cnt"
       }
     ],
     "servicedPeriod":{
       "start":"2000-10-01",
       "end":"2000-10-01"
     },
     "quantity":{
       "value":1
     },
     "category":{
       "coding":[
         {
           "system":"https://bluebutton.cms.gov/resources/variables/line_cms_type_srvc_cd",
           "code":"2",
           "display":"Surgery"
         }
       ]
     },
     "sequence":1,
     "diagnosisLinkId":[
       2
     ],
     "adjudication":[
       {
         "category":{
           "coding":[
             {
               "system": "https://bluebutton.cms.gov/resources/codesystem/adjudication",
               "code": "https://bluebutton.cms.gov/resources/variables/carr_line_rdcd_pmt_phys_astn_c",
               "display":"Carrier Line Reduced Payment Physician Assistant Code"
             }
           ]
         },
         "reason":{
           "coding":[
             {
               "system":"https://bluebutton.cms.gov/resources/variables/carr_line_rdcd_pmt_phys_astn_c",
               "code":"0",
               "display":"N/A"
             }
           ]
         }
       },
       {
         "extension":[
           {
             "valueCoding":{
               "system":"https://bluebutton.cms.gov/resources/variables/line_pmt_80_100_cd",
               "code":"0",
               "display":"80%"
             },
             "url":"https://bluebutton.cms.gov/resources/variables/line_pmt_80_100_cd"
           }
         ],
         "amount":{
           "system":"urn:iso:std:iso:4217",
           "code":"USD",
           "value":250.0
         },
         "category":{
           "coding":[
             {
               "system":"https://bluebutton.cms.gov/resources/codesystem/adjudication",
               "code":"https://bluebutton.cms.gov/resources/variables/line_nch_pmt_amt",
               "display":"Line NCH Medicare Payment Amount"
             }
           ]
         }
       },
       {
         "category":{
           "coding":[
             {
               "system":"https://bluebutton.cms.gov/resources/codesystem/adjudication",
               "code":"https://bluebutton.cms.gov/resources/variables/line_bene_pmt_amt",
               "display":"Line Payment Amount to Beneficiary"
             }
           ]
         },
         "amount":{
           "system":"urn:iso:std:iso:4217",
           "code":"USD",
           "value":0.0
         }
       }
     ]
   }
 ]
}
Back to Start of Section
Back to Top of Page
IV. Postman Collection
This collection contains example requests to public endpoints for the DPC API. To use this collection, you must have the Postman app downloaded onto your computer and have your local vault configured as described here. Use the vault to ensure private information isn’t synced to the cloud. This collection includes requests, the sandbox environment, and global variables to be imported into your Postman app.
- Select the Data at the Point of Care Sandbox environment (top right).
- Fill in your key_id: This is the DPC ID of your public key, which is returned to you when the public key is uploaded to the DPC Portal. You need this to generate a JSON Web Token (JWT), which will be exchanged for an access token.
- Add the following values to your vault:
- client_token: Your client token is generated through the DPC Portal. Be sure to save a copy of your token in a safe place.
- PRIVATE_KEY: If you do not already have your public and private keys, please generate your public/private key pair through the DPC Portal.
- Within your vault, go to settings and turn on “Enable support in scripts.”
With these three values in place, the JWT and a fresh access token are automatically generated for you before each request in this Postman collection. This prevents you from having to manually refresh the access token every five minutes while using the collection.
You can find additional instructions and details within the description of each request in the postman collection. You can view these by clicking the drop-down arrow next to each request title.
Patient/$everything
Patient/{id}/$everything is an endpoint that allows users to retrieve all resources about a patient using their DPC internal ID (UUID), represented as {id} in the request. Included in the resources will be the Patient, Coverage, and ExplanationOfBenefit Resources for one patient’s historical data from the last seven years, combined into a bundle. It is a synchronous download, so it differs from the Group $export operation in that it does not create a job that needs to be monitored or data files to download. The response body will contain the bundle.
If you only have the Medicare Beneficiary Identifier (MBI) of the patient, you can retrieve the DPC internal ID by first making a GET request for that specific patient as the UUID is returned in that response. See List a Specific Patient for details.
A Patient record must already exist in the DPC database to successfully complete your Patient/$everything request; however, the patient does not need to belong to a group.
This request requires an X-Provenance header for attestation (see example).
Learn more about the HL7 FHIR Specification for:
Operation Patient Everything (Release v4)
Operation Operation Patient Everything (Release v3)
Request
GET /api/v1/Patient/{id}/$everythingcURL command
curl -v https://sandbox.dpc.cms.gov/api/v1/Patient/{id}/$everything
     -H 'Authorization: Bearer {access_token}' \
     -H 'Accept: application/fhir+json' \
     -H 'X-Provenance: {FHIR Provenance resource}